

OpenEBS on DigitalOcean Marketplace
Abhishek
3-12-2020
/ 2 min to readShare
Deploying OpenEBS on DigitalOcean can directly be done from the console. DigitalOcean provides the feature to create a cluster with OpenEBS deployed on it already. To get started, follow the below-mentioned steps:
WORKFLOW:

STEP 1: Getting started
Login to your DigitalOcean account.
STEP 2: Creation of cluster
Once you log in, you arrive at the dashboard, click on Marketplace under DISCOVER located on the left sidebar.
Next, scroll down to find OpenEBS. On clicking, you will be redirected to a page where you will find the details about OpenEBS and the Create OpenEBS button on the right side.
Next, you need to provide the necessary details such as Data Center region, cluster capacity, cluster name, etc. (It is advisable to provision 3 nodes with 4vCPUs and 8 GB memory to ensure that the resources are sufficient at all times.)

STEP 3: Connecting your cluster Creation, resizing, and deletion can be carried out from UI, but you require command-line tools from your local machine or a remote management server to perform administrative tasks. The detailed steps to install the management tools and connect the cluster to your local machine can be found under the Overview section.

To verify, execute the following command:
$ kubectl get ns
Output:
NAME     STATUS    AGE
default  Active    13m
openebs  Active    13m
The output must contain openebs ns in an Active state.
Next, execute:
$ kubectl get pods -n openebs
Output:
NAME                                                 READY     STATUS    RESTARTS AGE
openebs-admission-server-5c4d545647-r4vgr            1/1       Running   0        13m
openebs-apiserver-56f77c9965-xft68                   1/1       Running   2        13m
openebs-localpv-provisioner-64c67b5b89-czv8b         1/1       Running   0        13m
openebs-ndm-5f6nt                                    1/1       Running   0        13m
openebs-ndm-74njq                                    1/1       Running   0        13m
openebs-ndm-operator-7bc769dcff-b45bc                1/1       Running   1        13m
openebs-ndm-spttv                                    1/1       Running   0        13m
openebs-provisioner-755f465f9d-fr67l                 1/1       Running   0        13m
openebs-snapshot-operator-7988fc8646-zpd98           2/2       Running   0        13m
All the pods must be in a running state.
STEP 4: Attaching BlockDevices
To attach BlockDevices to the created nodes, click on Volumes on the left sidebar and then click on the Add Volume button.

Next, select the volume size ( provision at least 30 GB), select the node(droplet) to which it gets attached and provides a name, then click on the Create Volume button. Repeat these steps for each node (droplet).

NOTE:
For cStor, choose Manually Mount and Format under Choose Configuration Options.
For Jiva, choose Automatically Format and Mount under Choose Configuration Options.
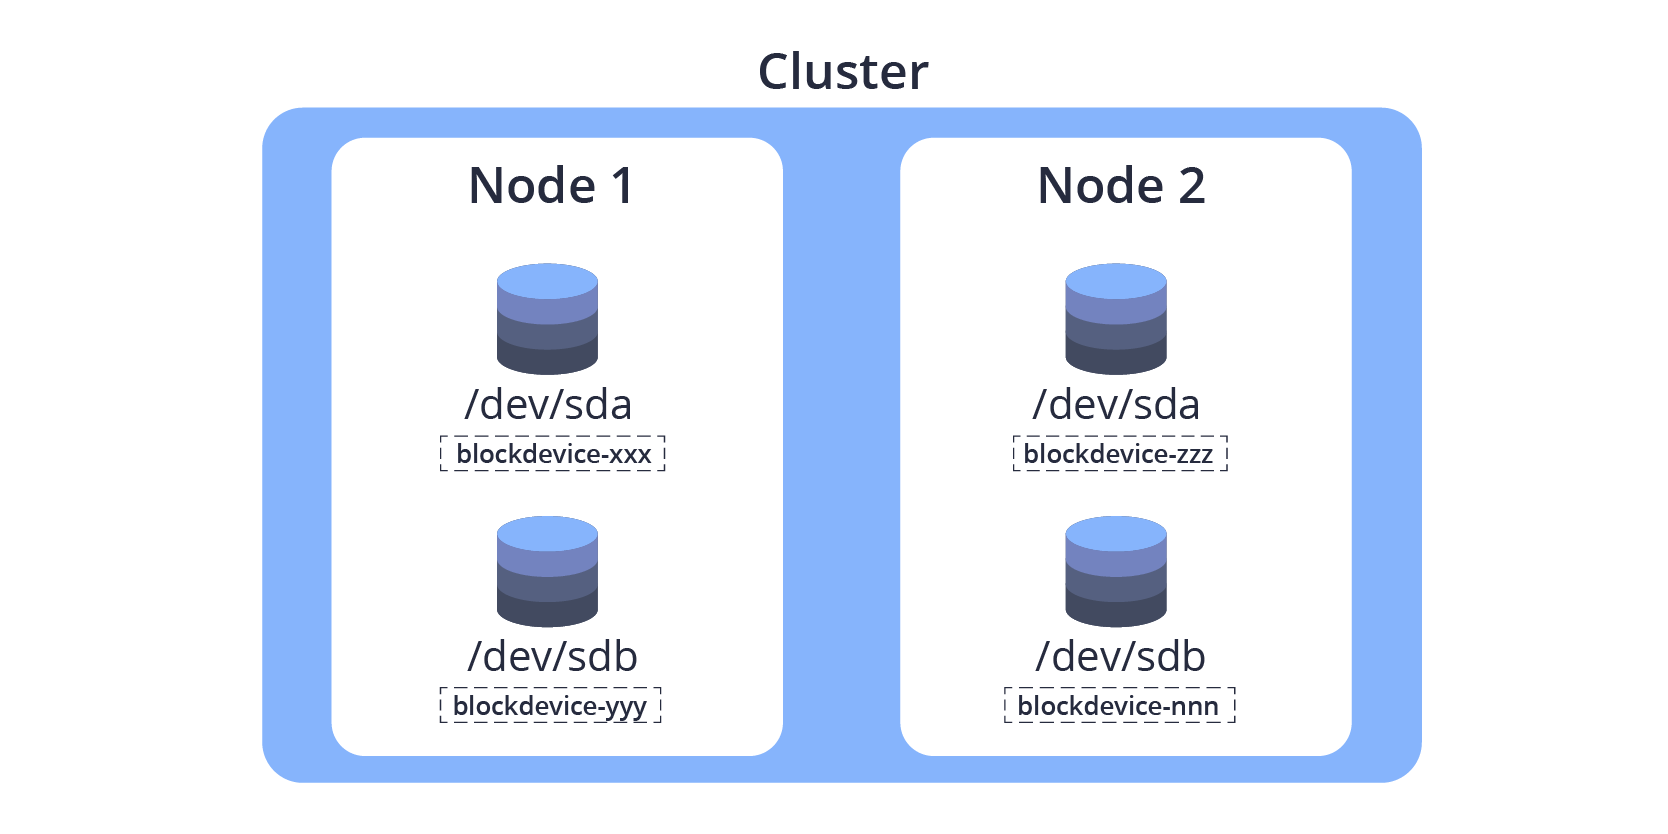
After the BlockDevices get attached for all the nodes, you can see an output similar to the below image.

Next, you have to provision OpenEBS volumes. Click here to know more.
Great news! You’re 1 article smarter!
Share
Storage is Evolving!
Atlassian Jira Deployment on OpenEBS
Based on your reading story

OpenEBS — The containerized storage
In the infrastructure space, the compute environment is always the first to lead the change. Docker has brought in the new thinking into every DevOPs administrator and application developer.

Running through the mud looking skywards
I always believe, bridging the minds of academia & industry has to go beyond the nuances of theory vs. practical.
Atlassian Jira Deployment on OpenEBS
Learn how to deploy Atlassian Jira on OpenEBS in this short post.
Scaling up cStor Volume Replica
OpenEBS provides volume replication through different storage engines. Learn how to scale up cStor Volume Replica.
OpenEBS 3.0 Release
Announcing OpenEBS 3.0 release - with ability to create 9 types of volumes.

A hands on demo of Volume Populator using OpenEBS LVM CSI driver
In this blog we will write a volume populator and create a volume with that populator This is written using libvolumepopulator This is a control loop on PVC that maintains the lifecycle of the PV ...
-on-kubernetes-with-openebs-localpv.png)
Logical Volume Management (LVM) on Kubernetes with OpenEBS LocalPV
In large production environments various physical disks are typically pooled to handle user and application storage needs Logical Volume Management LVM is a storage virtualization technology that ...
Provisioning OpenEBS Jiva volumes via CSI
Container Storage Interface CSI is the new model for integrating storage system drivers with container orchestration systems like Kubernetes This new interface is a major benefit to the container ...
Deploying YugabyteDB on Google Kubernetes Engine with OpenEBS
In this blog post, we’ll walk you through the necessary steps to get a 3 node YugabyteDB cluster running on top of GKE, backed by OpenEBS.
Repeatable OpenEBS Mayastor deployments and benchmarks
Learn about Repeatable OpenEBS Mayastor deployments and benchmarks

How are TikTok, Flipkart, KubeSphere, and others using OpenEBS for Local Volumes
How are TikTok, Flipkart, KubeSphere, and others using OpenEBS for Local Volumes

OpenEBS NDM, go-to solution for managing Kubernetes Local Storage
Read about OpenEBS NDM, the go-to solution for managing Kubernetes Local Storage.

Storage is Evolving!
Learn how storage has evolved over the years.
Mayastor Engine Reaches Beta
Mayastor, the storage engine by OpenEBS has reached the beta stage. Read the blog to know more.
Migrate CSPIs to a different node by moving the disks
Step by step guide to migrate CStorPoolInstances from one node to different nodes by moving the set of underlying disks

OpenEBS Backup/Restore for ZFS-LocalPV
Overview of how to use Velero Backup/Restore plugin for ZFS-LocalPV to protect it against data loss.

OpenEBS 2.2.0 - Enhancements And New Storage Capabilities
OpenEBS 2.2.0 is here! Read this post to learn about the new updates.

Hacktoberfest 2020 - Contribute to OpenEBS
Hacktoberfest 2020 is almost here. Contribute to open source project, OpenEBS, to win exciting swag.

OpenEBS StorageClasses For ZFS-LocalPV
In this blog, I will discuss various storage classes we can use to dynamically provision the volumes backed by ZFS-LocalPV Storage Pool.
Resize Kubernetes StatefulSets without impact
Read this post if you are a cStor CSI user who's looking to resize statefulsets without any impact of StatefulSet applcations.

Handling node down/cluster scaling on LocalPV backed workloads
In this article, we'll discuss the steps that is getting handled when a node down/cluster scaling on LocalPV backs workloads.

OpenEBS-Velero backup/restore of stateful applications
In this blog, we will go through the backup/restore solution provided to its users by OpenEBS with the help of Velero.
Kubernetes StatefulSet on ppc64le using OpenEBS LocalPV provisioner
In this blog, we'll explain how to install OpenEBS on Kubernetes StatefulSet running on the ppc64le platform & to using the OpenEBS LocalPV provisioner to deploy a StatefulSet.

Restricting cStor pool usage within a specified threshold value
Learn how to restrict cStor pool usage within a specified threshold value
Getting started with K3s in vSphere and OpenEBS cStor
In this blog, more of a tutorial, I will walk you through the steps to install K3OS and setup OpenEBS.

Resizing the ZFS-LocalPV Volumes
In this post, we will focus on how we can resize the volumes provisioned by ZFS-LocalPV without restarting the application.
Snapshot and Clone for ZFS LocalPV
In this post, we will focus on how we can create a snapshot and clone for volumes provisioned by ZFS-LocalPV.

Setup Continuous Integration for Helm chart
In this blog, we'll set up a continuous integration of the Helm chart. We'll package the Helm chart with the help of CI tools & push them to chart registry.

Monitoring ZFS-LocalPV Volumes
In this post, we will focus on how we can set up the Prometheus alert for Provisioned volumes when space utilization has reached a critical point.
Uniquely identifying disks in OpenEBS on VMWare platform
A little bit of background I work at a company called MayaData who develops a very cool Open Source software called OpenEBS CNCF Sandbox project that simplifies the deployment of stateful applicati...
Creating manual BlockDevice
BlockDevices are the consumable units of storage in the OpenEBS storage solution Users can create BlockDevices manually to support custom partitionslvms etc which are not detected by NDM To crea...
 — troubleshooting-tips.png)
OpenEBS Node Device Management (NDM) — Troubleshooting tips
OpenEBS Node Device Management aka NDM helps in discovering the block devices attached to Kubernetes nodes In this blog I will walk through some of the scenarios I have seen working with users on ...
cStor Pool Operations via CSPC in OpenEBS
CStor Data Engine is popular for workloads needing efficient capacity management replicas point in time snapshots incremental backups etc The tutorial will provision striped cStor pools and perfo...
OpenEBS Dynamic Volume Provisioning on ZFS
OpenEBS ZFS driver binds a ZFS file system into the Kubernetes environment and allows users to provision and deprovision volumes dynamically This blog will demonstrate how to deploy a Percona appli...

ECK & OpenEBS — Data Ops Streamlines Deployment
Using OpenEBS administrators can easily manage local PV storage resources for ECK seamlessly across both onpremises and multiple clouds simplifying ElasticSearch ECK scaling and resilience while fi...

The Myth of THE database
In this blog I briefly discuss the disaggregation of the DB at what might be called the macro or architecture level and then at the micro or intra DB level.

Using Chaos Engineering to harden applications that use NuoDB, OpenEBS
Developer agility is key to increasing the efficiency of software development One of the primary areas in which development could be slowed down is the process that kicks in once the code is merged b...

OpenEBS community releases v1.1, maintaining a faster release cadence.
In this blog I will provide a quick summary of the changes that were released as part of OpenEBS version and also share some thoughts on the evolving project management process in OpenEBS and how...

OpenEBS Project Update and whats coming in v1.0
My heartfelt gratitude to hundreds of contributors and thousands of users and friends of OpenEBS who have contributed to OpenEBS becoming a CNCF Sandbox Project.

Configuring OpenEBS to run with Security-Enhanced Linux
In this short How-To blog, I will walk you through the steps for running OpenEBS with Security Enhanced Linux (SELinux=on).
Deploying OpenEBS on SUSE CaaS platform
I am recently introduced to OpenEBS, an easy to use persistent storage option for Kubernetes and found it nicely working on the SuSE CaaS platform where I could certify the cloud native databases.
High Availability For Jira Using OpenEBS
Up time high availability disaster recovery Anyone that has been working in development or IT operations roles knows these terms Maintaining these things is always touted as the most critical of c...
Dynamic provisioning of Kubernetes Local PVs using OpenEBS
In this blog I discuss why we are adding the support of Local Persistent Volumes to the open source OpenEBS I view this as a significant step forward in our mission of delivery true data agility to...

Block volume support for OpenEBS volume
A block volume is a volume that appears as a block device inside the container and allows low-level access to the storage without intermediate layers, as with file-system volumes.

Litmus - Journey of a storage e2e and chaos framework for Kubernetes
The objective of the Litmus project is to help evaluate stateful workloads on Kubernetes via storage & infrastructure focused end-to-end (e2e) tests that use chaos engineering tools & principles
-chaos-engineering-with-litmus---an-overview.png)
(Storage) Chaos Engineering with Litmus - An Overview
In this extremely insightful article, Evan Powell outlines various possible failures that could occur in a Kubernetes cluster running stateful workloads & the possible means to mitigate them..

How to deploy NuoDB on Kubernetes with OpenEBS
NuoDB is a container-native adaptive-scale distributed SQL database designed with distributed application deployment challenges in mind.

Inspired by SCale17x — a short history of data storage
Last weekend I had the pleasure of attending SCale x in Pasadena just outside Los Angeles Whether it was Robert Treats excellent talk on logical replication for PostgreSQL or refreshing my knowle...

Becoming a Kubernaut - Top Learnings in my journey of becoming a CKA
I would like to tell you about my experience with the Certified Kubernetes Administrator (CKA) exam.

OpenEBS releases 0.8.1 with stability fixes and improved documentation
OpenEBS 0.8.1 is released today. In spite of being a tagged as a minor release, it has significant stability improvements and few important features.

HA vs. DR and HA² for your DB
This post is intended to share observations gathered from a couple of decades worth of experience in helping enterprises build resilient systems and presented based on feedback from Kubernetes and Sta...

Running your own DBaaS based on your preferred DBs, Kubernetes operators and containerized storage
This blog is intended to outline some things to think about when running your own DBaaS While I recommend considering these I also suggest that you should think long and hard about operations automa...

Performance tuning, CAS and OpenEBS
Now and again — ok almost every day — we get a question on the community or from our commercial users about performance.

Bare metal to production stateful workloads- OpenEBS and Rancher 2.x
Besides having a really cool name, Montel Intergalactic is also a cool company to work with. I met one of their engineers in an OpenEBS Slack forum and explained to him what I was up to

OpenEBS 0.8 release allows you to Snapshot and Clone cStor Volumes
cStor as a new Storage Engine and Node Disk Manager (NDM) that were introduced in the previous release have proven to be quite popular with DevOps user community.
Experience with OpenEBS in this Hacktoberfest
From Hacktoberfest website, I came to know that Open Source Cafe Bangalore is conducting Hacktoberfest workshops every weekend and they are also providing some awesome goodies for our contributions.
Running OpenEBS On Custom Rancher Cluster
In this blog, I will be explaining how to deploy an application in a custom Rancher cluster on an OpenEBS volume.
![How to install IBM Cloud Private? [Updated]](/images/blog/how-to-install-ibm-cloud-private?-[updated].png)
How to install IBM Cloud Private? [Updated]
In this blog, I will provide step-by-step instructions on how to configure a Kubernetes-based managed private cloud using ICP.
Using OpenEBS for running Kubernetes stateful applications on AWS instance store disks
In this post, I will cover the topic of “How to set up persistent storage” using AWS instance store disks for applications running on Kubernetes clusters.
Contributing to mayactl cli in Hacktoberfest 2018
Hacktoberfest is an excellent platform for first-time, open-source hackers to start their journey. mayactl is a tool that allows for contribution at any level.
Using OpenEBS as the TSDB for Prometheus
Prometheus has become one of the favorite tools for monitoring metrics of applications and infrastructure in the cloud native space, especially when using Kubernetes;
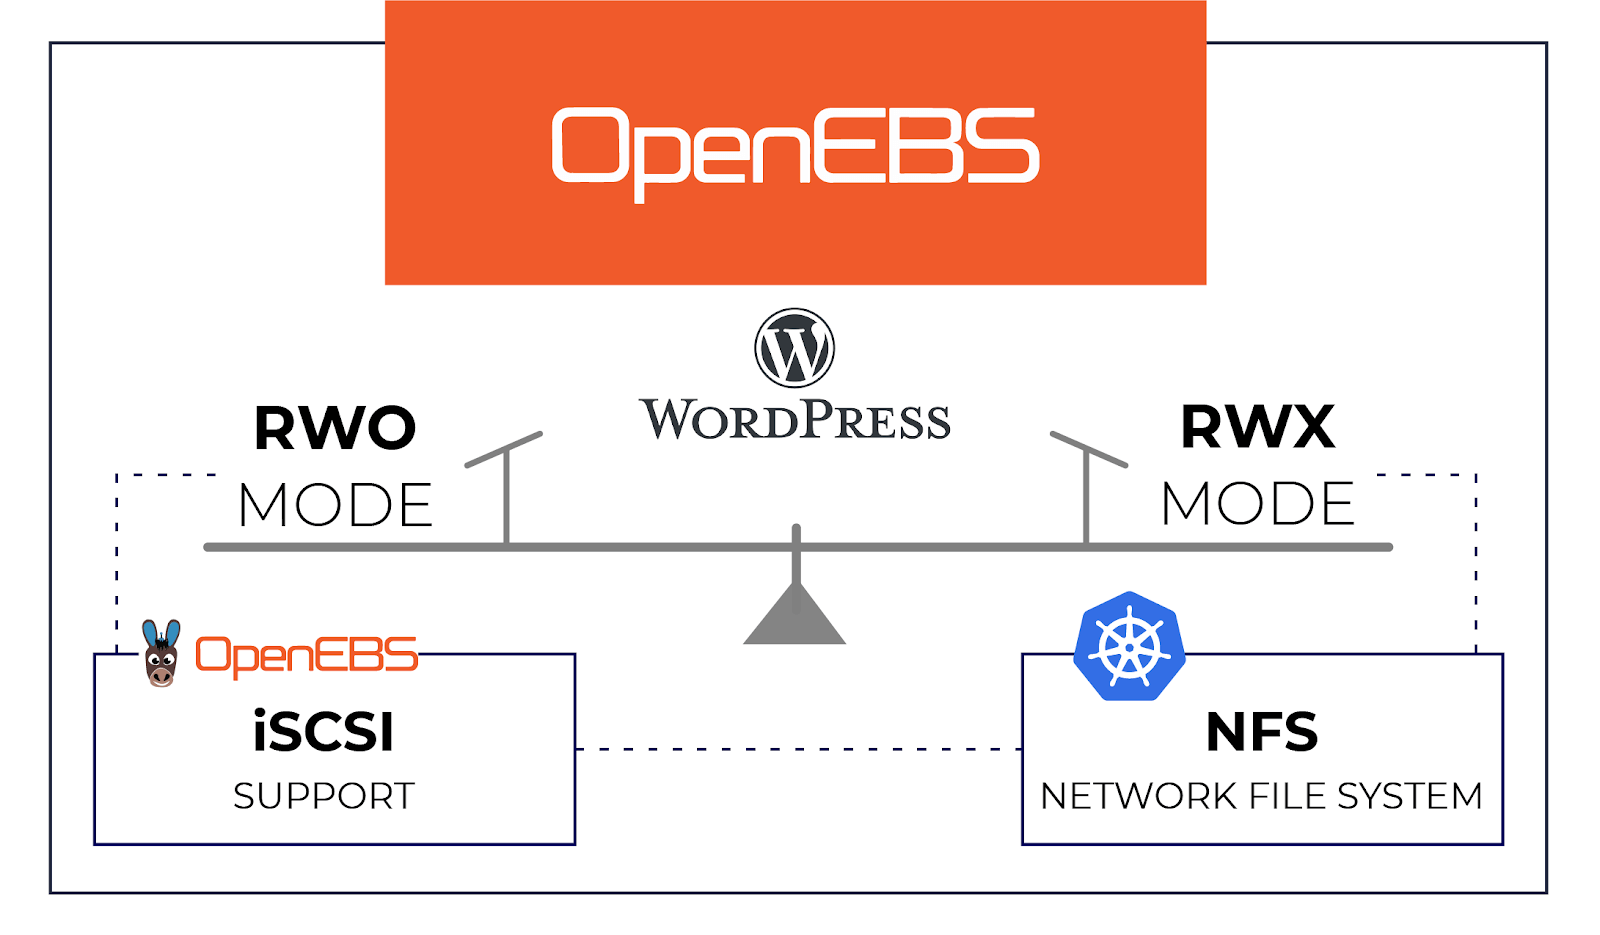
Setting up persistent volumes in RWX mode using OpenEBS
Many stateful applications like WordPress require persistent storage in ReadWriteMany or RWX mode OpenEBS is popular in the opensource community for its ease of use and its simplistic design for ...

Storage Scheduling goes mainstream in Kubernetes 1.12
With every new release of Kubernetes, I find myself in awe and also at ease with the choices we made early on to marry OpenEBS with Kubernetes.

Celebrate Hacktoberfest 2018 with OpenEBS !!
The 5th edition of Hacktoberfest is around the corner and it will be the second Hacktoberfest experience for the OpenEBS community. All of us are excited!

Keeping OpenEBS volumes in RW state during “Node down” scenarios
In this blog, I will go through a read-only issue faced at our lab in Kubernetes environment while using OpenEBS, and will also go through its possible workarounds.

OpenEBS 0.7 Release pushes cStor Storage Engine to field trials!
Before I get into some fascinating features of release I would like to take this opportunity to thank all users who have taken our OpenEBS survey and have come forward to share your Kubernetes St...

Provisioning Kubernetes cluster by kubeadm
Kubeadm is a new tool that is part of the Kubernetes distribution of 1.4.0. It allows you to install and set up a Kubernetes cluster.
Building persistent storage with OpenEBS and Local SSDs on GKE
In this blog post, we’ll discuss the advantages of using GKE Local SSDs instead of GPDs and how to set up persistent storage using OpenEBS for highly available storage volumes.

cStor Pool Provisioning in OpenEBS 0.7
OpenEBS team is happy to announce the release of 0.7 which comes with a new storage engine for creating storage pool known as cStor engine.
How to start contributing to mayactl
mayactl is the command line tool for interacting with OpenEBS volumes mayactl is not usedrequired while provisioning or managing the OpenEBS volumes but it is currently used while debugging and tro...

Provisioning Google Cloud with k8s using it’s in-house tool, KOPS
Setting up and using a cluster in GCP offers a few significant advantages over using GKE For instance using GCP gives the user the liberty to use their custom binaries or a pure Open Source Kubernet...
Setting up WordPress and SQL with OpenEBS
Wordpress is a well-known blogging platform. New bloggers are often surprised when they find out how easy it is to get set up and start their first piece in this popular tool.

Recap of Google Next’18
This year I have attended a number of tech events and in terms of size, organization, and especially the content — Next ’18 is so far my favorite.
Designating OpenEBS pods to run on specific K8S Nodes
OpenEBS does not have a separate scheduler used to manage scheduling pods. Instead, it uses the Kubernetes scheduler for managing the scheduling needs of an administrator.

OpenEBS 0.6 serves IOs amidst Chaos and much more
We are very excited to announce the availability of OpenEBS version 0.6. I would like to take a few minutes to talk about what has been keeping us busy in making it GA.

How do I run a litmus test to compare storage performance on Kubernetes
Ever so often developers and devops engineers building or managing stateful applications on Kubernetes are on the lookout for for suitable storage options which serves their applications specific ne...

OpenEBS announces the availability of version 1.0
In this blog I will touch upon what I have learned from users about Open Source CAS solutions like OpenEBS at KubeCon EU followed by a quick note on the major changes in and what is in the im...
Git freedom on Kubernetes
Here is one of the fastest ways to get your private repository with Gitlab up and running on your Kubernetes environment — Let’s “Make DevOps lifecycle private again”
Berlin K8s meetup retrospect
Last week I was invited to give a talk about OpenEBS during the Kubernetes meetup in Berlin The event was hosted by the friendly folks at Profitbricks who once again I want to thank for the lovely ...
-—-taking-off-nicely.png)
Container Attached Storage (CAS) — Taking off nicely
I had the fortune of presenting to a group of brilliant folks at SNIA India SDC event last week This event being in Bangalore I could sense the heat emanating from technology savvy brains mostly fro...

My First Contribution to OpenEBS #OSS
Writing documentation for any project is tough, be it big or small, propriety or open-source. Rewriting and improving it is even tougher. Let no one tell you any different.

Using Kubernetes Custom Resources for Microservices IPC
This blog talks about why I used Custom Resources as a way for communication between different microservices (aka Kubernetes Pods).

How do I create an OpenEBS storage pool on Google Persistent Disk
The OpenEBS volume replicas, which are the actual backend storage units of the OpenEBS iSCSI target currently store the data in a hostPath on the Kubernetes nodes.

Using chaoskube with OpenEBS.
Chaos Engineering is the discipline of proving the reliability of any system by causing “chaos”. The word ‘Chaos’ means the state of confusion or failure caused due to unexpected reason.
-to-the-kubernetes-nodes-where-they-were-scheduled?.png)
How do I pin the OpenEBS Replica Pod(s) to the Kubernetes Nodes where they were scheduled?
A OpenEBS Volume comprises of a Controller pod and one or more Replica pod(s). Controller pod (also known as a Target pod) is the one to which the application can make an iSCSI connection.

How do I configure OpenEBS to use storage on specific Kubernetes nodes?
A OpenEBS Volume comprises of a Target pod and Replica pod(s). There can be one or more Replica pods. The Replica pods are the ones that access the underlying disk resources for storing the data.

Achieving native hyper convergence in Kubernetes
Hyper convergence has a lot of benefitswhich is one reason it has become popular in the traditional infrastructurecentric world of virtual machines with proprietary vendors like Nutanix reaching p...

OpenEBS plus Red Hat OpenShift and StackPointCloud and IBM Cloud Private and….
This week we announced that our partnership with Red Hat is flourishing We achieved their Primed level of certification for their OpenShift offerings and are seeing more and more users rely upon Open...

How to install OpenEBS on OpenShift?
OpenShift Origin is the upstream community project used in all deployment models provided by Red Hat OpenShift such as OpenShift Online, OpenShift Dedicated, and OpenShift Container Platform.

Using OpenEBS as a Kubernetes persistent volume
OpenEBS is a containerized block storage written in Go for cloud native and other environments which make the data workloads more reliable in Kubernetes.

In 2018 - IT dreams deferred finally achieved?
At MayaData, we believe we, and others are building the foundation for a much longer cycle of software-centric innovation thanks to proactively eliminating sources of lock-in.
How to install OpenEBS on IBM Cloud Private
What is IBM Cloud Private? IBM Cloud Private (ICP) is a new application platform that is based on Kubernetes and provides services for developing and managing on-premises containerized applications.

How to deploy Jenkins on Kubernetes + OpenEBS
Modern development requires Continuous Integration Continuous Delivery CICD and it means building and validating your software on every commit to make sure your development test environments ar...

How to deploy a PostgreSQL Cluster on Kubernetes + OpenEBS
Why Postgres on Kubernetes Well the answer is in the question If you are already running Kubernetes on some form of cloud you understand the easeofuse scalability and monitoring benefits of Ku...

How to Install OpenEBS on AWS using StackPointCloud?
What is StackPointCloud? StackPointCloud is a managed Kubernetes control plane to build cloud-native stacks on AWS, Google Cloud (GKE & GCE), Azure & DigitalOcean.
How to Install OpenEBS with Kubernetes using MiniKube
Whether you are a newbie to Kubernetes looking for a small setup to start or a developer who uses Kubernetes on a daily basis minikube is the tool that helps you quickly set up and run a Kubernetes e...

Why are users using OpenEBS on EBS?
We were a little surprised to see OpenEBS started to be used on top of EBS itself. So we dug in and asked why?

Quick update on OpenEBS v0.4 — a developer friendly release!!
OpenEBS v0.4.0 is out and I take pride in sharing that it is powered by the same set of tools, used by communities that have adopted DevOps DNA for delivering products.

ARA - Recording Ansible Playbook Runs
Ansible playbooks can generate quite a lot of console data. Add the -v (I do it by default!) and you have quite a lot to scroll through.

Are you afraid of Go?
Are you an experienced C programmer or perhaps an adept Java hacker finding Go somewhat awkward to deal with.

Tech Enthusiasts weighing in on Container Native Storage
These redditers are like the nights-watch-men (Operations Team) who are guarding the wall (production services) from army of dead (issues).

OpenEBS building Go Storage Kit Project — Maya
I attended GopherCon India there was a talk on Package Oriented Design In Go by William Kennedy In that talk William explained some really important and thoughtful design principles which we...

Cloud Native storage vs. marketers doing Cloud Washing
Let’s try to protect the phrases Cloud-Native storage and Container Native storage; or maybe we should start using a yet more specific phrase such as Containerized Storage for Containers

Container Native Storage builds its High Availability in style
Infrastructure components are the toughest to build. It is meant to work always by default.

Test Driven Development — The DevOps Way
TDD is the abbreviated form for Test Driven Development It might also be true incase of newbies to have never heard of TDD in the current season where DevOps NoOps DataOps ML IOT rule the roos...

OpenEBS on the Growth Path! Releases 0.3
It gives me immense pleasure to watch this baby (OpenEBS) successfully cross another milestone with its 0.3 release.

Storage infrastructure as code using OpenEBS
With a vision to become de-facto block storage choice for stateful container applications, OpenEBS brings out many unique features to the open source storage space.

Data Scientists adopting tools and solutions that allow them to focus more on Data Science and less…
Data Science as we all know is becoming crucial to many if not most businesses around the world Data Science and ML are decidedly the most trendy skills that a lot of people are aspiring to acquire ...
.png)
Multi-Node Kubernetes 1.6 Cluster provisioning made easy using SandBox (Vagrant box)
Working on OpenEBS a containerized storage for containers which is orchestrated by Kubernetes most of our tasks be it development testing and demo require us to setup and modify the nodes in Kuber...

Rancher’s Longhorn announcement solidifies the OpenEBS story
Today, Sheng Liang unveiled project Longhorn as a new way to build distributed block storage for cloud and container-based platform.

OpenEBS sprinting ahead, 0.2 released
I am delighted that we have been able to push the OpenEBS 0.2 release for community consumption, a version that demonstrates that storage controllers can be containerized.

Using OpenEBS to build a true on-premise container service
The top questions that could be lingering on the enterprise architect mind in an enterprise are

Deployment modes of OpenEBS
OpenEBS supports two modes — Hyper-converged and dedicated. The deployment mode really depends on where and how you want to use OpenEBS.

Containerization meetup - Containers for storage too
I had the opportunity to talk to a very good group of technologists, DevOPs users in the Digital Ocean Containerization Meetup . Docker 1.13 details and Kubernetes deployment tips were fantastics.

Emerging Storage Trends for Containers
The smiling docker whale is everywhere these days. You either have ridden on it or you want to know how to ride on it. As far as operations teams are concerned the docker whale is just teasing them.

OpenEBS Building blocks — Rancher Longhorn
In the previous blog post I shared the initial details of OpenEBS In this post I will continue to discuss the OpenEBS technology building blocks and touch upon the details of Rancher longhorn and w...
OpenEBS — The containerized storage
In the infrastructure space, the compute environment is always the first to lead the change. Docker has brought in the new thinking into every DevOPs administrator and application developer.
Running through the mud looking skywards
I always believe, bridging the minds of academia & industry has to go beyond the nuances of theory vs. practical.
Atlassian Jira Deployment on OpenEBS
Learn how to deploy Atlassian Jira on OpenEBS in this short post.
Scaling up cStor Volume Replica
OpenEBS provides volume replication through different storage engines. Learn how to scale up cStor Volume Replica.
OpenEBS 3.0 Release
Announcing OpenEBS 3.0 release - with ability to create 9 types of volumes.
A hands on demo of Volume Populator using OpenEBS LVM CSI driver
In this blog we will write a volume populator and create a volume with that populator This is written using libvolumepopulator This is a control loop on PVC that maintains the lifecycle of the PV ...
Logical Volume Management (LVM) on Kubernetes with OpenEBS LocalPV
In large production environments various physical disks are typically pooled to handle user and application storage needs Logical Volume Management LVM is a storage virtualization technology that ...
Provisioning OpenEBS Jiva volumes via CSI
Container Storage Interface CSI is the new model for integrating storage system drivers with container orchestration systems like Kubernetes This new interface is a major benefit to the container ...
Deploying YugabyteDB on Google Kubernetes Engine with OpenEBS
In this blog post, we’ll walk you through the necessary steps to get a 3 node YugabyteDB cluster running on top of GKE, backed by OpenEBS.
Repeatable OpenEBS Mayastor deployments and benchmarks
Learn about Repeatable OpenEBS Mayastor deployments and benchmarks
How are TikTok, Flipkart, KubeSphere, and others using OpenEBS for Local Volumes
How are TikTok, Flipkart, KubeSphere, and others using OpenEBS for Local Volumes
OpenEBS NDM, go-to solution for managing Kubernetes Local Storage
Read about OpenEBS NDM, the go-to solution for managing Kubernetes Local Storage.
Storage is Evolving!
Learn how storage has evolved over the years.
Mayastor Engine Reaches Beta
Mayastor, the storage engine by OpenEBS has reached the beta stage. Read the blog to know more.
Migrate CSPIs to a different node by moving the disks
Step by step guide to migrate CStorPoolInstances from one node to different nodes by moving the set of underlying disks
OpenEBS Backup/Restore for ZFS-LocalPV
Overview of how to use Velero Backup/Restore plugin for ZFS-LocalPV to protect it against data loss.
OpenEBS 2.2.0 - Enhancements And New Storage Capabilities
OpenEBS 2.2.0 is here! Read this post to learn about the new updates.
Hacktoberfest 2020 - Contribute to OpenEBS
Hacktoberfest 2020 is almost here. Contribute to open source project, OpenEBS, to win exciting swag.
OpenEBS StorageClasses For ZFS-LocalPV
In this blog, I will discuss various storage classes we can use to dynamically provision the volumes backed by ZFS-LocalPV Storage Pool.
Resize Kubernetes StatefulSets without impact
Read this post if you are a cStor CSI user who's looking to resize statefulsets without any impact of StatefulSet applcations.
Handling node down/cluster scaling on LocalPV backed workloads
In this article, we'll discuss the steps that is getting handled when a node down/cluster scaling on LocalPV backs workloads.
OpenEBS-Velero backup/restore of stateful applications
In this blog, we will go through the backup/restore solution provided to its users by OpenEBS with the help of Velero.
Kubernetes StatefulSet on ppc64le using OpenEBS LocalPV provisioner
In this blog, we'll explain how to install OpenEBS on Kubernetes StatefulSet running on the ppc64le platform & to using the OpenEBS LocalPV provisioner to deploy a StatefulSet.
Restricting cStor pool usage within a specified threshold value
Learn how to restrict cStor pool usage within a specified threshold value
Getting started with K3s in vSphere and OpenEBS cStor
In this blog, more of a tutorial, I will walk you through the steps to install K3OS and setup OpenEBS.
Resizing the ZFS-LocalPV Volumes
In this post, we will focus on how we can resize the volumes provisioned by ZFS-LocalPV without restarting the application.
Snapshot and Clone for ZFS LocalPV
In this post, we will focus on how we can create a snapshot and clone for volumes provisioned by ZFS-LocalPV.
Setup Continuous Integration for Helm chart
In this blog, we'll set up a continuous integration of the Helm chart. We'll package the Helm chart with the help of CI tools & push them to chart registry.
Monitoring ZFS-LocalPV Volumes
In this post, we will focus on how we can set up the Prometheus alert for Provisioned volumes when space utilization has reached a critical point.
Uniquely identifying disks in OpenEBS on VMWare platform
A little bit of background I work at a company called MayaData who develops a very cool Open Source software called OpenEBS CNCF Sandbox project that simplifies the deployment of stateful applicati...
Creating manual BlockDevice
BlockDevices are the consumable units of storage in the OpenEBS storage solution Users can create BlockDevices manually to support custom partitionslvms etc which are not detected by NDM To crea...
OpenEBS Node Device Management (NDM) — Troubleshooting tips
OpenEBS Node Device Management aka NDM helps in discovering the block devices attached to Kubernetes nodes In this blog I will walk through some of the scenarios I have seen working with users on ...
cStor Pool Operations via CSPC in OpenEBS
CStor Data Engine is popular for workloads needing efficient capacity management replicas point in time snapshots incremental backups etc The tutorial will provision striped cStor pools and perfo...
OpenEBS Dynamic Volume Provisioning on ZFS
OpenEBS ZFS driver binds a ZFS file system into the Kubernetes environment and allows users to provision and deprovision volumes dynamically This blog will demonstrate how to deploy a Percona appli...
ECK & OpenEBS — Data Ops Streamlines Deployment
Using OpenEBS administrators can easily manage local PV storage resources for ECK seamlessly across both onpremises and multiple clouds simplifying ElasticSearch ECK scaling and resilience while fi...
The Myth of THE database
In this blog I briefly discuss the disaggregation of the DB at what might be called the macro or architecture level and then at the micro or intra DB level.
Using Chaos Engineering to harden applications that use NuoDB, OpenEBS
Developer agility is key to increasing the efficiency of software development One of the primary areas in which development could be slowed down is the process that kicks in once the code is merged b...
OpenEBS community releases v1.1, maintaining a faster release cadence.
In this blog I will provide a quick summary of the changes that were released as part of OpenEBS version and also share some thoughts on the evolving project management process in OpenEBS and how...
OpenEBS Project Update and whats coming in v1.0
My heartfelt gratitude to hundreds of contributors and thousands of users and friends of OpenEBS who have contributed to OpenEBS becoming a CNCF Sandbox Project.
Configuring OpenEBS to run with Security-Enhanced Linux
In this short How-To blog, I will walk you through the steps for running OpenEBS with Security Enhanced Linux (SELinux=on).
Deploying OpenEBS on SUSE CaaS platform
I am recently introduced to OpenEBS, an easy to use persistent storage option for Kubernetes and found it nicely working on the SuSE CaaS platform where I could certify the cloud native databases.
High Availability For Jira Using OpenEBS
Up time high availability disaster recovery Anyone that has been working in development or IT operations roles knows these terms Maintaining these things is always touted as the most critical of c...
Dynamic provisioning of Kubernetes Local PVs using OpenEBS
In this blog I discuss why we are adding the support of Local Persistent Volumes to the open source OpenEBS I view this as a significant step forward in our mission of delivery true data agility to...
Block volume support for OpenEBS volume
A block volume is a volume that appears as a block device inside the container and allows low-level access to the storage without intermediate layers, as with file-system volumes.
Litmus - Journey of a storage e2e and chaos framework for Kubernetes
The objective of the Litmus project is to help evaluate stateful workloads on Kubernetes via storage & infrastructure focused end-to-end (e2e) tests that use chaos engineering tools & principles
(Storage) Chaos Engineering with Litmus - An Overview
In this extremely insightful article, Evan Powell outlines various possible failures that could occur in a Kubernetes cluster running stateful workloads & the possible means to mitigate them..
How to deploy NuoDB on Kubernetes with OpenEBS
NuoDB is a container-native adaptive-scale distributed SQL database designed with distributed application deployment challenges in mind.
Inspired by SCale17x — a short history of data storage
Last weekend I had the pleasure of attending SCale x in Pasadena just outside Los Angeles Whether it was Robert Treats excellent talk on logical replication for PostgreSQL or refreshing my knowle...
Becoming a Kubernaut - Top Learnings in my journey of becoming a CKA
I would like to tell you about my experience with the Certified Kubernetes Administrator (CKA) exam.
OpenEBS releases 0.8.1 with stability fixes and improved documentation
OpenEBS 0.8.1 is released today. In spite of being a tagged as a minor release, it has significant stability improvements and few important features.
HA vs. DR and HA² for your DB
This post is intended to share observations gathered from a couple of decades worth of experience in helping enterprises build resilient systems and presented based on feedback from Kubernetes and Sta...
Running your own DBaaS based on your preferred DBs, Kubernetes operators and containerized storage
This blog is intended to outline some things to think about when running your own DBaaS While I recommend considering these I also suggest that you should think long and hard about operations automa...
Performance tuning, CAS and OpenEBS
Now and again — ok almost every day — we get a question on the community or from our commercial users about performance.
Bare metal to production stateful workloads- OpenEBS and Rancher 2.x
Besides having a really cool name, Montel Intergalactic is also a cool company to work with. I met one of their engineers in an OpenEBS Slack forum and explained to him what I was up to
OpenEBS 0.8 release allows you to Snapshot and Clone cStor Volumes
cStor as a new Storage Engine and Node Disk Manager (NDM) that were introduced in the previous release have proven to be quite popular with DevOps user community.
Experience with OpenEBS in this Hacktoberfest
From Hacktoberfest website, I came to know that Open Source Cafe Bangalore is conducting Hacktoberfest workshops every weekend and they are also providing some awesome goodies for our contributions.
Running OpenEBS On Custom Rancher Cluster
In this blog, I will be explaining how to deploy an application in a custom Rancher cluster on an OpenEBS volume.
How to install IBM Cloud Private? [Updated]
In this blog, I will provide step-by-step instructions on how to configure a Kubernetes-based managed private cloud using ICP.
Using OpenEBS for running Kubernetes stateful applications on AWS instance store disks
In this post, I will cover the topic of “How to set up persistent storage” using AWS instance store disks for applications running on Kubernetes clusters.
Contributing to mayactl cli in Hacktoberfest 2018
Hacktoberfest is an excellent platform for first-time, open-source hackers to start their journey. mayactl is a tool that allows for contribution at any level.
Using OpenEBS as the TSDB for Prometheus
Prometheus has become one of the favorite tools for monitoring metrics of applications and infrastructure in the cloud native space, especially when using Kubernetes;
Setting up persistent volumes in RWX mode using OpenEBS
Many stateful applications like WordPress require persistent storage in ReadWriteMany or RWX mode OpenEBS is popular in the opensource community for its ease of use and its simplistic design for ...
Storage Scheduling goes mainstream in Kubernetes 1.12
With every new release of Kubernetes, I find myself in awe and also at ease with the choices we made early on to marry OpenEBS with Kubernetes.
Celebrate Hacktoberfest 2018 with OpenEBS !!
The 5th edition of Hacktoberfest is around the corner and it will be the second Hacktoberfest experience for the OpenEBS community. All of us are excited!
Keeping OpenEBS volumes in RW state during “Node down” scenarios
In this blog, I will go through a read-only issue faced at our lab in Kubernetes environment while using OpenEBS, and will also go through its possible workarounds.
OpenEBS 0.7 Release pushes cStor Storage Engine to field trials!
Before I get into some fascinating features of release I would like to take this opportunity to thank all users who have taken our OpenEBS survey and have come forward to share your Kubernetes St...
Provisioning Kubernetes cluster by kubeadm
Kubeadm is a new tool that is part of the Kubernetes distribution of 1.4.0. It allows you to install and set up a Kubernetes cluster.
Building persistent storage with OpenEBS and Local SSDs on GKE
In this blog post, we’ll discuss the advantages of using GKE Local SSDs instead of GPDs and how to set up persistent storage using OpenEBS for highly available storage volumes.
cStor Pool Provisioning in OpenEBS 0.7
OpenEBS team is happy to announce the release of 0.7 which comes with a new storage engine for creating storage pool known as cStor engine.
How to start contributing to mayactl
mayactl is the command line tool for interacting with OpenEBS volumes mayactl is not usedrequired while provisioning or managing the OpenEBS volumes but it is currently used while debugging and tro...
Provisioning Google Cloud with k8s using it’s in-house tool, KOPS
Setting up and using a cluster in GCP offers a few significant advantages over using GKE For instance using GCP gives the user the liberty to use their custom binaries or a pure Open Source Kubernet...
Setting up WordPress and SQL with OpenEBS
Wordpress is a well-known blogging platform. New bloggers are often surprised when they find out how easy it is to get set up and start their first piece in this popular tool.
Recap of Google Next’18
This year I have attended a number of tech events and in terms of size, organization, and especially the content — Next ’18 is so far my favorite.
Designating OpenEBS pods to run on specific K8S Nodes
OpenEBS does not have a separate scheduler used to manage scheduling pods. Instead, it uses the Kubernetes scheduler for managing the scheduling needs of an administrator.
OpenEBS 0.6 serves IOs amidst Chaos and much more
We are very excited to announce the availability of OpenEBS version 0.6. I would like to take a few minutes to talk about what has been keeping us busy in making it GA.
How do I run a litmus test to compare storage performance on Kubernetes
Ever so often developers and devops engineers building or managing stateful applications on Kubernetes are on the lookout for for suitable storage options which serves their applications specific ne...
OpenEBS announces the availability of version 1.0
In this blog I will touch upon what I have learned from users about Open Source CAS solutions like OpenEBS at KubeCon EU followed by a quick note on the major changes in and what is in the im...
Git freedom on Kubernetes
Here is one of the fastest ways to get your private repository with Gitlab up and running on your Kubernetes environment — Let’s “Make DevOps lifecycle private again”
Berlin K8s meetup retrospect
Last week I was invited to give a talk about OpenEBS during the Kubernetes meetup in Berlin The event was hosted by the friendly folks at Profitbricks who once again I want to thank for the lovely ...
Container Attached Storage (CAS) — Taking off nicely
I had the fortune of presenting to a group of brilliant folks at SNIA India SDC event last week This event being in Bangalore I could sense the heat emanating from technology savvy brains mostly fro...
My First Contribution to OpenEBS #OSS
Writing documentation for any project is tough, be it big or small, propriety or open-source. Rewriting and improving it is even tougher. Let no one tell you any different.
Using Kubernetes Custom Resources for Microservices IPC
This blog talks about why I used Custom Resources as a way for communication between different microservices (aka Kubernetes Pods).
How do I create an OpenEBS storage pool on Google Persistent Disk
The OpenEBS volume replicas, which are the actual backend storage units of the OpenEBS iSCSI target currently store the data in a hostPath on the Kubernetes nodes.
Using chaoskube with OpenEBS.
Chaos Engineering is the discipline of proving the reliability of any system by causing “chaos”. The word ‘Chaos’ means the state of confusion or failure caused due to unexpected reason.
How do I pin the OpenEBS Replica Pod(s) to the Kubernetes Nodes where they were scheduled?
A OpenEBS Volume comprises of a Controller pod and one or more Replica pod(s). Controller pod (also known as a Target pod) is the one to which the application can make an iSCSI connection.
How do I configure OpenEBS to use storage on specific Kubernetes nodes?
A OpenEBS Volume comprises of a Target pod and Replica pod(s). There can be one or more Replica pods. The Replica pods are the ones that access the underlying disk resources for storing the data.
Achieving native hyper convergence in Kubernetes
Hyper convergence has a lot of benefitswhich is one reason it has become popular in the traditional infrastructurecentric world of virtual machines with proprietary vendors like Nutanix reaching p...
OpenEBS plus Red Hat OpenShift and StackPointCloud and IBM Cloud Private and….
This week we announced that our partnership with Red Hat is flourishing We achieved their Primed level of certification for their OpenShift offerings and are seeing more and more users rely upon Open...
How to install OpenEBS on OpenShift?
OpenShift Origin is the upstream community project used in all deployment models provided by Red Hat OpenShift such as OpenShift Online, OpenShift Dedicated, and OpenShift Container Platform.
Using OpenEBS as a Kubernetes persistent volume
OpenEBS is a containerized block storage written in Go for cloud native and other environments which make the data workloads more reliable in Kubernetes.
In 2018 - IT dreams deferred finally achieved?
At MayaData, we believe we, and others are building the foundation for a much longer cycle of software-centric innovation thanks to proactively eliminating sources of lock-in.
How to install OpenEBS on IBM Cloud Private
What is IBM Cloud Private? IBM Cloud Private (ICP) is a new application platform that is based on Kubernetes and provides services for developing and managing on-premises containerized applications.
How to deploy Jenkins on Kubernetes + OpenEBS
Modern development requires Continuous Integration Continuous Delivery CICD and it means building and validating your software on every commit to make sure your development test environments ar...
How to deploy a PostgreSQL Cluster on Kubernetes + OpenEBS
Why Postgres on Kubernetes Well the answer is in the question If you are already running Kubernetes on some form of cloud you understand the easeofuse scalability and monitoring benefits of Ku...
How to Install OpenEBS on AWS using StackPointCloud?
What is StackPointCloud? StackPointCloud is a managed Kubernetes control plane to build cloud-native stacks on AWS, Google Cloud (GKE & GCE), Azure & DigitalOcean.
How to Install OpenEBS with Kubernetes using MiniKube
Whether you are a newbie to Kubernetes looking for a small setup to start or a developer who uses Kubernetes on a daily basis minikube is the tool that helps you quickly set up and run a Kubernetes e...
Why are users using OpenEBS on EBS?
We were a little surprised to see OpenEBS started to be used on top of EBS itself. So we dug in and asked why?
Quick update on OpenEBS v0.4 — a developer friendly release!!
OpenEBS v0.4.0 is out and I take pride in sharing that it is powered by the same set of tools, used by communities that have adopted DevOps DNA for delivering products.
ARA - Recording Ansible Playbook Runs
Ansible playbooks can generate quite a lot of console data. Add the -v (I do it by default!) and you have quite a lot to scroll through.
Are you afraid of Go?
Are you an experienced C programmer or perhaps an adept Java hacker finding Go somewhat awkward to deal with.
Tech Enthusiasts weighing in on Container Native Storage
These redditers are like the nights-watch-men (Operations Team) who are guarding the wall (production services) from army of dead (issues).
OpenEBS building Go Storage Kit Project — Maya
I attended GopherCon India there was a talk on Package Oriented Design In Go by William Kennedy In that talk William explained some really important and thoughtful design principles which we...
Cloud Native storage vs. marketers doing Cloud Washing
Let’s try to protect the phrases Cloud-Native storage and Container Native storage; or maybe we should start using a yet more specific phrase such as Containerized Storage for Containers
Container Native Storage builds its High Availability in style
Infrastructure components are the toughest to build. It is meant to work always by default.
Test Driven Development — The DevOps Way
TDD is the abbreviated form for Test Driven Development It might also be true incase of newbies to have never heard of TDD in the current season where DevOps NoOps DataOps ML IOT rule the roos...
OpenEBS on the Growth Path! Releases 0.3
It gives me immense pleasure to watch this baby (OpenEBS) successfully cross another milestone with its 0.3 release.
Storage infrastructure as code using OpenEBS
With a vision to become de-facto block storage choice for stateful container applications, OpenEBS brings out many unique features to the open source storage space.
Data Scientists adopting tools and solutions that allow them to focus more on Data Science and less…
Data Science as we all know is becoming crucial to many if not most businesses around the world Data Science and ML are decidedly the most trendy skills that a lot of people are aspiring to acquire ...
Multi-Node Kubernetes 1.6 Cluster provisioning made easy using SandBox (Vagrant box)
Working on OpenEBS a containerized storage for containers which is orchestrated by Kubernetes most of our tasks be it development testing and demo require us to setup and modify the nodes in Kuber...
Rancher’s Longhorn announcement solidifies the OpenEBS story
Today, Sheng Liang unveiled project Longhorn as a new way to build distributed block storage for cloud and container-based platform.
OpenEBS sprinting ahead, 0.2 released
I am delighted that we have been able to push the OpenEBS 0.2 release for community consumption, a version that demonstrates that storage controllers can be containerized.
Using OpenEBS to build a true on-premise container service
The top questions that could be lingering on the enterprise architect mind in an enterprise are
Deployment modes of OpenEBS
OpenEBS supports two modes — Hyper-converged and dedicated. The deployment mode really depends on where and how you want to use OpenEBS.
Containerization meetup - Containers for storage too
I had the opportunity to talk to a very good group of technologists, DevOPs users in the Digital Ocean Containerization Meetup . Docker 1.13 details and Kubernetes deployment tips were fantastics.
Emerging Storage Trends for Containers
The smiling docker whale is everywhere these days. You either have ridden on it or you want to know how to ride on it. As far as operations teams are concerned the docker whale is just teasing them.
OpenEBS Building blocks — Rancher Longhorn
In the previous blog post I shared the initial details of OpenEBS In this post I will continue to discuss the OpenEBS technology building blocks and touch upon the details of Rancher longhorn and w...
OpenEBS — The containerized storage
In the infrastructure space, the compute environment is always the first to lead the change. Docker has brought in the new thinking into every DevOPs administrator and application developer.
Running through the mud looking skywards
I always believe, bridging the minds of academia & industry has to go beyond the nuances of theory vs. practical.